Must Haves For Pet Photography
As a Dog Photographer, you’ve got to have some essential tools of the trade to get a dog’s attention and keep them focused for photos.
If you’ve found yourself here, you are in luck, because today, I’m sharing some really essentials things to keep in your Dog Photography kit for every single session.
If by chance you’re thinking I’m sharing my pet photography photo equipment in this post, I’m not!
I’m really talking more about the essential tools of the trade to help make every shoot a grand success (like treats!).
You can also watch the companion video to this post here or check out my full kit here. (This post has been recently updated in 2026 and I’m happy to say I still use everything in this post for every session!)
Anything you purchase will help to support our business at no cost to you. You can read my full Affiliate Disclosure policy here.
PS. Looking to start your pet photography business or set it up from the legal standpoint? Click here to get get my free Start Your Pet Photography Checklist and kickstart your pet photography business today!
Pssst…. love this post? Be sure to pin it for later!

Things To Have In Your Pet Photography Kit
If you’re working with pets, specifically dogs, you’ve got to carry some key things in your photography kit to help capture and keep their attention for photos.
So, in this post, I’m dishing my must-have tools of the trade as a Dog Photographer.
But, if you want to know my tools of the trade I carry with me to every shoot for the most successful session possible, this is the post for you.
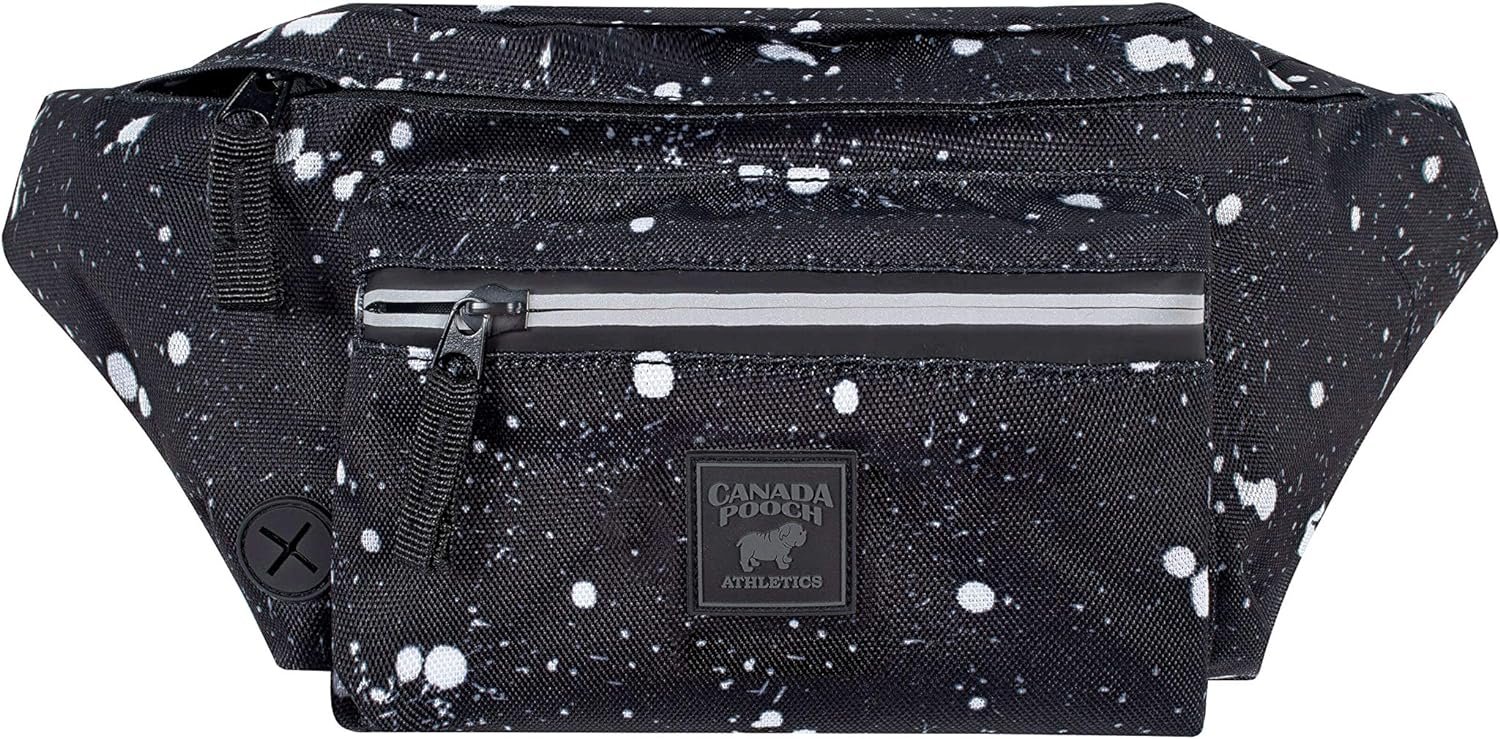
FANNY PACK / TREAT POUCH
If you’re working with dogs, you definitely need something to tuck all of your treats, toys, and poop bags in! For me, that’s a water-resistant Fanny Pack from Canada Pooch. Honestly, a friend had this one and talked about how good quality it was for the price point, so I went for it. Did I mention I’ve never looked back?!
It has a spacious front pocket for treats, lots of interior space to hold additional treats, a tennis ball or two, and a side pocket to insert poop bags. The fanny pack strap is durable, adjustable, and comfortable, too.
When I have to lay on the ground, I just simply turn the fanny pack backwards and I still have access to all of my accessories.
I also appreciate the zippered pockets to keep everything safely tucked away when I’m not using them.
I’ve purchased both the black-and-white along with the camouflage. I’ve had both for a number of years now and they hold up well!
I also like that this fanny pack is water resistant which is important for rainy sessions or session on the water!
2. Noisemaker Lanyard
I get a lot of looks about this out in public, but I don’t know how I lived before I purchased a Primo Hunting Call Lanyard. Made from a durable synthetic material that’s build to last, this lanyard holds up to five calls (or more if you just use one ring per call).
Not only do I tuck a few of my favorite calls on there (which I will share below), but I also cinch a couple of squeakers on there, too.
It makes different noise options easily accessible for me when I’m photographing and keeps everything within arms reach. If you know how quickly a dog can move, then you know that time is of the essence when searching for treats, noisemakers, etc.
This accessory won’t win you any fashion awards, but it sure is helpful. You will get a lot of questions about this lanyard, too, so be prepared that it’s a conversation starter!

3. Noisemakers
As a Dog Photographer, being novel and exciting is key. I love to have as many noisemakers on hand as I can for a session that are primarily things that a dog doesn’t hear every day.
While I keep a few around my neck, such as the Duck Call and Rabbit Call along with a squeaker or two, the others I’ll keep safely tucked in my bag and bring them out when I need something fresh and new to get a pup’s attention.
Some of my other favorite noisemakers include this silly little pig that most dogs go crazy for, a rubber chicken, and the coveted squeaky tennis ball.
Ones that I don’t have yet, but that friends of mine love include things like a pitch pipe, a mini harmonica, and of course, crazy noises you can make, too!
I’ll keep adding to this list, but here are a few to get you started. Remember, the more novel the better! Sometimes you can only use a noise once or twice before a dog becomes bored from it.

4. Tennis Balls
I mentioned these a moment ago, but instead of having one kind of tennis ball in your arsenal, I usually carry two types.
We have the squeaky tennis ball I mentioned above and then we have the more durable rubber tennis ball. When you are working with rescue dogs especially, you never know how they are with toys.
If you see a dog that looks like they are going to destroy a squeaky tennis ball or if they start guarding it, I usually opt to switch out and give him the rubber tennis ball instead for fear that he will swallow one or destroy it entirely (and try to eat the outside material).
Be careful though, sometimes once you break the squeaky tennis ball out for a session - client or rescue - it’s game over! Some dogs will only have eyes for the tennis ball and nothing else. This can work in your favor, but it can also work against you depending on how serious their tennis ball love it.
Don’t say you haven’t been warned! ;)

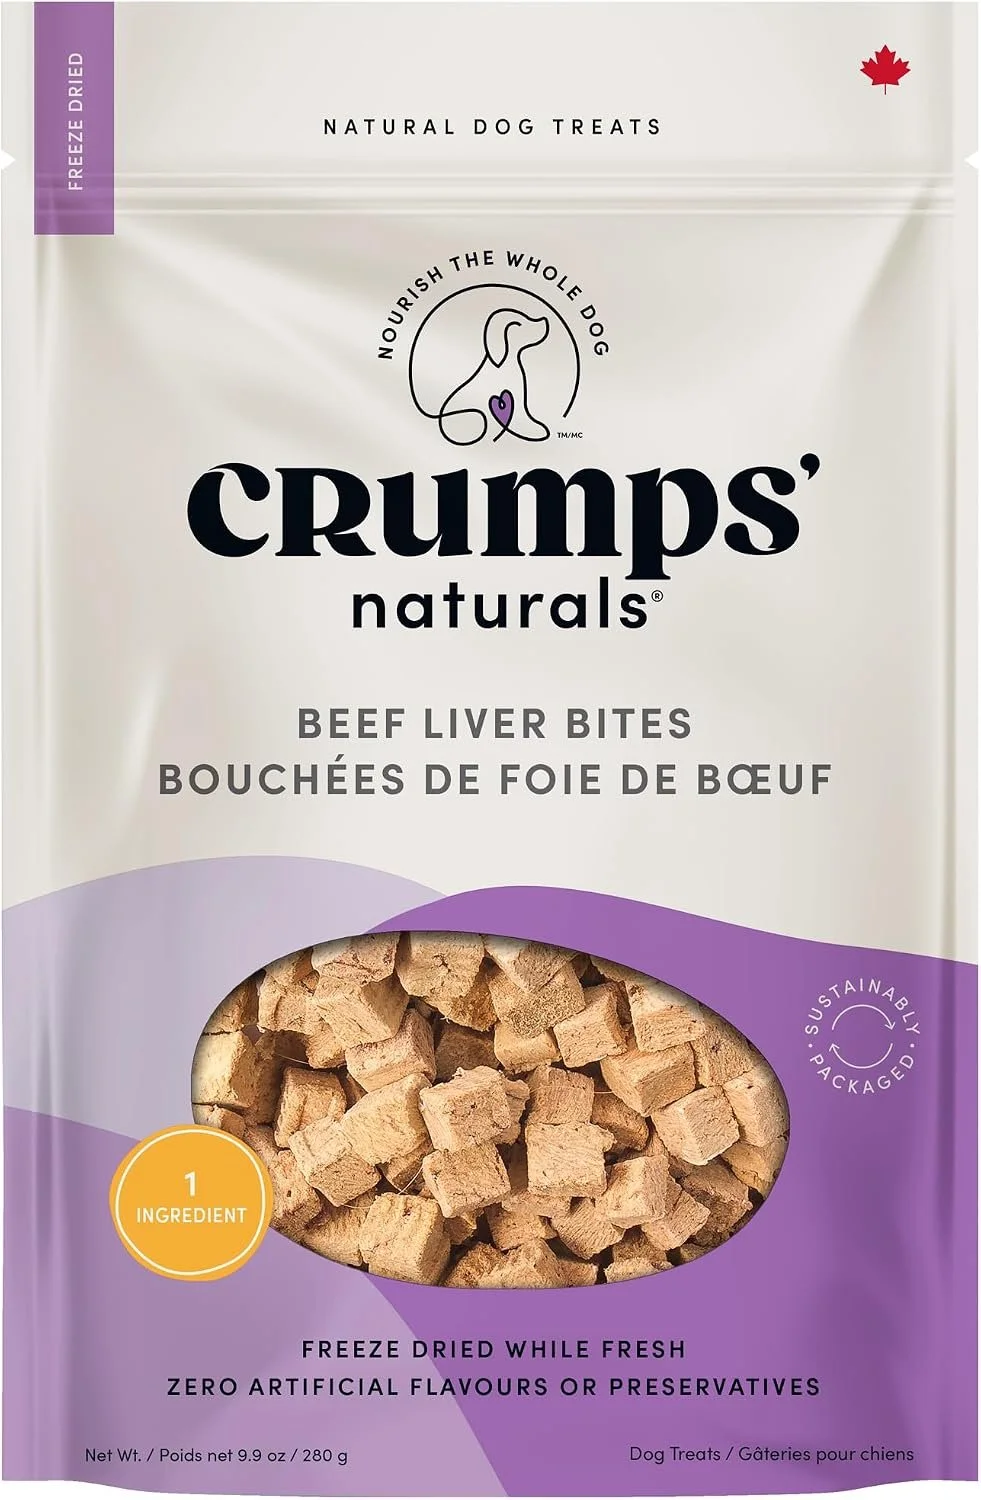
5. TREATS
But not just any treats! There are a lot of things to take into consideration when it comes to having treats on hand for clients.
I have found most dogs are allergic to chicken or poultry, so I generally avoid those from the git go.
You also have to take into consideration that they put a lot of ingredients into dog treats that shouldn’t be there, like excess preservatives or other ingredients I can’t even pronounce. I never want to feed a dog something that could potentially be harmful to them!
I also recommend to aim for small, bite size treats (or ones you can tear / break up easily) that won’t fill up a dog especially depending on the size of the pup(s) you are working with.
Lastly, in addition to consider size and ingredients, it’s good to have a variety of snacks on hand, because each dog is going to like different things. You might even get the occasional dog that doesn’t like anything at all or who won’t be food motivated.
Usually, I have the following on hand or suggest these options for pet parents to bring, too:
Freeze Dried Liver (my favorite!)
String Cheese
Boiled Chicken, if not allergic or sensitive to it
Natural Hot Dogs (cut up into small pieces)
Buddy Butter Peanut Butter pouches (freeze them in advance!)
Other Licky Pouches (We love BarkPouch!)
And the like…
Over the years, I’ve found that even the pickiest of dogs will go for a string cheese or a higher-value liver pouch, but not always. Again, that’s why it’s good to have a hierarchy on hand especially if you are working at a busy event or photographing shelter dogs!
6. POOP BAGS
It should go without saying, but please bring poop bags to your session! In fact, have some tucked away in your camera bag, kit bag, car, etc.
It never fails it’s the one thing pet parents accidentally forget or don’t have on hand and that’s where you come in! You don’t want to be that photographer that isn’t picking up your client’s *ahem* poop…
You might have a certain kind of poop bag that you like, but I prefer compostable and non-scented. These are also heavier duty, so they don’t break super easily (which is important, am I right?!).
Plus, you can buy these in bulk, which is nice, too!

7. LONG LINE
Assuredly, you are going to have four-legged clients that cannot be off leash, but you still want to aim for some awesome action or candid shots, that’s where a Lupine Long Line comes in.
Thirty feet of durable, high-quality synthetic material, this is a very inexpensive investment to have on hand to give your furry client a bit more space throughout their session.
The reason I prefer the fabric to the other materials, like the very popular Biothane, is because this is a more inexpensive product and is easier for an assistant / client to wrangle without getting rope burns.
While Biothane is super easy to clean and the synthetic takes a bit to dry, I have lost one or two of these in my day. With the $15 price point, I don’t worry as much about replacing them especially when they start to wear. When I’ve purchased custom Biothane long lines in the past and lost them, well that $50 investment hurts a bit more.
So, it’s entirely up to you, which type of long line you prefer to use for your sessions, but no matter which route you go, be sure to have one on hand. You’ll be really glad you did!
PS. Some clients have their own especially if they hike a lot with their dogs or do a lot of training, but don’t count on it.

8. PET CORRECTOR
Even though leash laws do exist, there is always a chance that an off leash dog will run up to you during a session especially in a popular dog-friendly locale.
In the event that does happen, keeping a Pet Corrector on you at all times is going to be helpful to scare the dog away or to prevent a fight from occurring.
The smaller version is easier to carry, but doesn’t have quite the impact the larger canister does. So, do yourself a favor, and get the larger size for it to be more effective.

9. FRESH WATER / BOWL
Much like with most everything else in your Pet Photography kit, it’s good to have fresh water on hand for both pets and people. Most pup parents come prepared, but if you live in a climate that can reach temperatures in excess of 90 degrees or more, water is an essential at sessions.
Obviously, we try not to be photographing at those temps, but that doesn’t mean that even at 70, 75, or even 80 degrees isn’t a bit more for our canine friends. This is especially true for seniors, puppies, or dogs with medical needs, who are more sensitive to heat.
I usually just bring a stainless steel bowl (which reduces cross contamination) and a large bottle of water, but I’ve seen people who use and love these for their sessions. Just be sure to wash thoroughly between uses or pick up a few to keep water separate if you are doing multiple sessions back to back.
I also use these daily for my personal dogs and I really like the ease and access of the bowl included with the water bottle. It’s pretty handy!

10. BUG SPRAY
When you work outdoors during all different times of the year in various environments, bug spray is a must have! Personally, I don’t use traditional bug sprays, but prefer a more natural alternative like this one especially given my proximity to pets and how highly toxic commercially available bug sprays can be for them.
But, it’s entirely up to you what kind you use as long as you use it'; just be sure the ingredients are safe for pups. Trust me, both you and your clients will be appreciative of the bug spray in peak Summer when mosquitos, ticks, gnats, etc are at their worst! Even if you don’t need it, it’s better to have on hand than not.
Get the natural bug spray I use here.
PS. In case I have to say it, this is NOT for pets, but for human use only. While it does have a small amount of Peppermint oil included in the bug spray blend, Peppermint can be highly toxic to pets. Use sparingly and a small distance away from pets when applying. You can also use the baby wipes to clean your hands after use before dolling out treats!

11. LENS CLEANER / CLOTH
The sheer amount of slobber, drool, treat dust, and other things that you will get on your lens is astonishing. Keep your lens(es) in tip top shape during a session with a lens cleaner and microfiber cloth. This is what I use.

12. BABY WIPES
You may not need them, but when you do, they come in handy. As I work outside in a lot of natural locations, getting dirty is going to happen. Either that or slobber. Or maybe bird poop. Or maybe you were digging in sand to get a lower vantage point for your camera on the beach and your hands are covered in sand.
Whatever the case, keeping a stack of baby wipes (all natural ones of course) on hand are going to become a valuable asset in your Pet Photography kit!

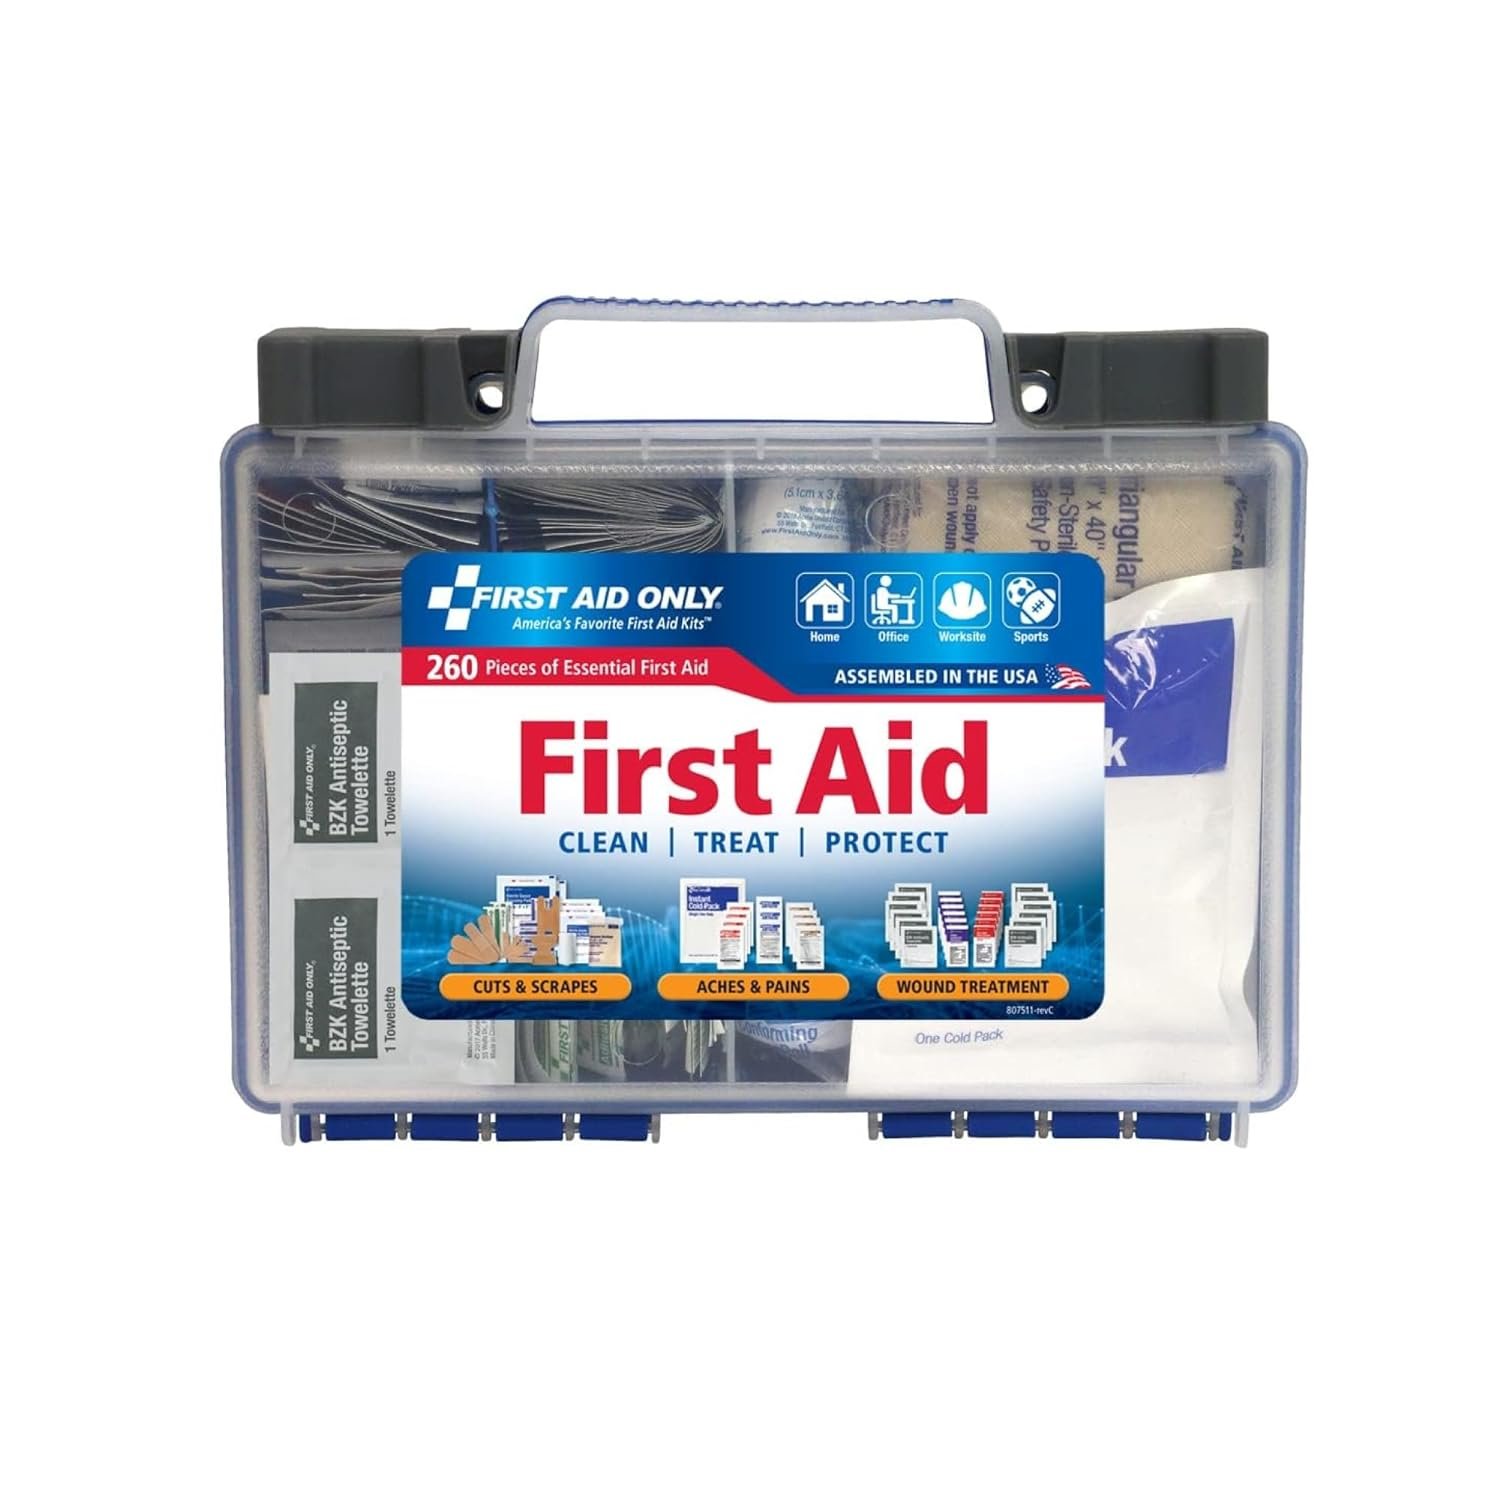
13. FIRST AID KIT
You never know what could happen at a session! Bug bites, cuts, scrapes, etc. So, I recommend keeping a First Aid Kit in your car for those moments when you might need it. This one has everything you need.
If you want to take it a step further, you can also pick up a Pet First Aid Kit as well! Like I said before, it’s better to be safe than sorry. Chances are you will never need it, but it gives me reassurance in case something does happen.
Get a human First Aid Kit here. Pick up a Pet First Aid Kit here.
14. COLLAPSIBLE WAGON
How did I live without thee? You’ve probably noticed that there is a lot of stuff on this list! So, how are we going to tote it all? With a handy dandy wagon!
I honestly don’t know how I ever did sessions without it. Not only does it haul all of your stuff, but it allows your clients to put their stuff in as well as you guys are traipsing around from location to location!
This one has been tested at the Lake, Beach, forest, field, etc, and can handle a multitude of terrains. If you want to get really fancy, it even has a side table with cup holders you can pop up during your session to hold beverages.
I love how easy it is to clean, set up, and break down. It is a little heavy to pick up, but nothing you can’t do just to put it in your trunk and take it back out.
One last disclaimer with the wagon is that sometimes, it does scare some dogs especially those who are easily startled or who are more fearful in general. They are totally freaked out by it.
So, depending on the session and the dog, will also usually depend if I use the wagon.
You’ll also be surprised by how many people will ask you where you got it, because they will want one to use at the beach, camping, etc, too!

15. HAND WARMERS
Rechargeable hand warmers are by far one of the best things I have invested in this past Winter. As I still shoot out in the cold quite a bit during that time of year, it’s nice to be able to warm up my hands throughout a session!
While I recommend rechargeable hand warmers for you, you might also want to buy some disposable ones to keep on hand for the other humans at your session. They also come in handy for long day events! I will tuck them in my pants pockets and sometimes my shoes if I am going to be outside for an especially long time. You might even get overheated with these they work so well!

16. MUCK BOOTS
Whether you are shooting at the beach or the lake or perhaps in a muddy forest after a ton of rain, Muck boots or goulashes, are going to come in handy a time or two for sure!
I like these because they are calf height allowing me to wade into the water with my subject for a unique perspective. They are completely waterproof and easy to wash off after the fact. I wouldn’t suggest these for long term walking, but they will do for any especially dreary, damp, wet, or rainy scenarios you find yourself in while taking pet photos.

17. THE STUMP
The one you’ve probably been waiting for! This portable stump has become such a handy prop to use during photo sessions. It’s lightweight, rugged, and perfect for small puppies or larger pups to put their paws up on. It just gives you another option to create some dimension and variety during your sessions.
If you do a lot of outdoors sessions and are looking for a fun prop to add in, highly recommend!
Get The Famous Stump here (well, it’s not really that famous, LOL).

Now, I know that is a lot of stuff! But, it’s all important, isn’t it? Don’t feel like you have to start with everything on this list, but feel free to build it up little by little over time (just like I did.)
WORK WITH US
OTHER POSTS YOU MIGHT LIKE
Develop An Amazing Client Experience
How To Price Your Pet Photography
Legal Must Haves For Your Pet Photography Business
